I still feel like the last Christmas was just yesterday. Right around Halloween a couple of weeks back I got an email in my Inbox from BF Ads Webmaster and I was like, huh? and I realized, yes, it's that time of the year! I couldn't believe that it was here already. We all at home felt like the last year just flew by.
So far BF Ads site has the Black Friday fliers of Macy's, Sears, CVS, Rite Aid, Walgreen's and Lowe's. So what are you looking forward to buy this year during the After Thanksgiving sale? Most people spend on electronics during that time, especially because it's supposed to be cheapest. But not really so. I've bought Hard Drives, DVD burners, cameras etc on Black Friday from Staples with coupons and Rebates and received the stuff practically free. But I know for sure, for some reason, the quality was sub par. For instance the DVD burner I bought from Staples broke in a few months and I went to HP website to get the drive update so I can make it work again. To my surprise the DVD burner I had was not a retail item and was an "OEM". It simply means, it came along with something else and hence has no separate drive update. So now I have to find a new one.
This year we are definitely getting a camcorder for the family. Since it is kind of a big ticket item that runs in the $400-600 range, we will be looking for Black Friday deals. My son AN would love a Wii. SN and I are still confused if we should get it for him or not. If we do, it is going to be yet another thing that we have to discipline him for. Still thinking about it.
Happy Tuesday everybody!

Tuesday, November 9, 2010

Friday, November 5, 2010
The dreaded Plackets: A picture how to
Oh, the plackets!
OK, so I needed to learn how to do plackets. I am looking to make a summer tunic for my son. I know, it's 40 degrees outside, which will only go down to -1 degree in the next three months. So why I am doing it? It's kind of a traditional men's wear in India and I wanted my son to have one. That's it. I am sure that's a good enough reason.
Here is a picture from amazon.com

You can see this product here in the below ilnk
See that placket in the front, in the above picture. I started hunting for tutorials. I did find a few, but nothing that showed plackets clearly with a contrast fabric for the placket vs the bodice. That is a concern because otherwise, you won't be able to clearly see what's being worked on. So I decided to come up with a basic placket construction-howto, with contrast fabric for the placket.
Note: The Fabric you see in the construction is not my son's tunic fabric :-) Just scraps I used to do the tutorial.
Plackets - How to
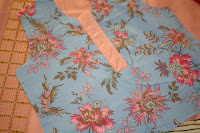
Minimum Requirements
- The main fabric bodice piece
- Placket Fabric - 8 in length X 6 in wide (Placket fabric may be the same fabric as the bodice, you may choose contrast)
- Sewing machine, needles, fabric, and any other fancy sewing tools you can't live without
Let's get started.
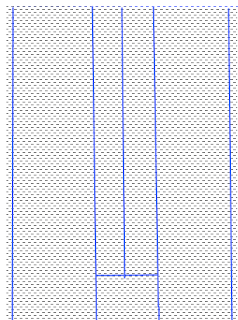
Step 1: Mark your placket pattern

- You will need to mark a line at the center of the placket (along the 8 inch side, remember that is the length of your placket) and 2 lines to the left and right of the center line 1/2 inch from the center
- You will also need to mark 1/4 inch seam allowance on the 8 inch sides
- Now mark a line 1 inch from the bottom of the placket connecting the lines you made to the right and left of the center
This is what you will end up with
Step 2: Align placket and bodice center, right side together
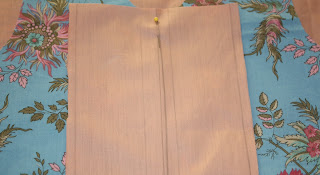
Align the center of the placket to the center of the shirt/dress and pin.
Step 3: Sew along the 3 lines
Sew along the markings to the right of the center line through both layers (main fabric and placket). Sew through the horizontal line and go to the other side of the center line.

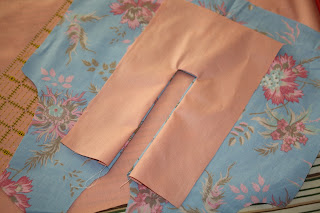
Step 4: Cut a Y along the center line
Now, cut along the center line starting from the neck end. Stop 1 inch away from the bottom of the placket end. Then cut towards both corners of the Y. Before you cut look at the picture below.
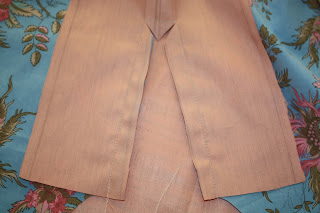
Step 5: Turn placket inside
Because we sewed right sides together you must know that there is some turning somewhere in the process. And you do that now, carefully. Now, press.
Step 6: Make a fabric Sandwich and sew
Now, you have the wrong side of the main fabric facing you and the right side of the placket. First we'll work on the left piece. Fold the seam allowance and then fold the whole left piece right in the middle. See a close up below.
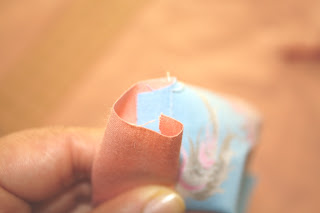
Press and sew along the seam of main fabric and placket fabric on the right side of the fabric because that stitch shows well, so you need to make sure that looks good. Now repeat the same for the right side. Now you will have two pieces overlapping one another. You can choose one or the other to go on the front. People say men's plackets are opened to the right and women's to the left. You choose your style now.
Step 7: Finishing Touches
Now on the Wrong side of your main fabric tuck in the 1 inch we left out earlier and pin in place
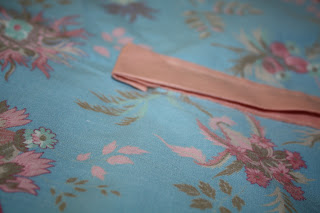
On the right side of the fabric, start with the placket that's overlapping the other, and sew along the folded edge and sew over the pins that you just placed. Now you will have 3 sides of a rectangle nicely sewn. Please pay attention and don't sew over both layers of the placket when you sew the folded edge.
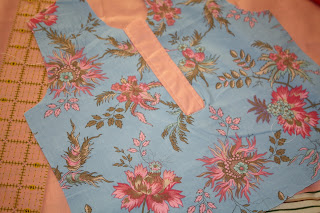
There you have it. A placket. I hope it helps
Tuesday, November 2, 2010
Better Late than Never
Good morning everybody!
I've been blog hopping and found awesome pictures of Halloween costumes and trick or treatin'. Yes, we also did have a blast at the parades at AN's and BN's schools and our condo community. Unfortunately, I haven’t been feeling good myself. Sunday mid night I got up to a bad sore throat and terrible headaches and body ache. I must have the flu. The worst part is, I can’t eat and I can’t swallow, my sore throat is killing me. SN took the kids to trick or treating as I had already started feeling bad after the parade on Sunday.
That is why I couldn’t post the pictures, and I was thinking this morning, should I post the pictures or not. Remember, I made the costumes for AN & BN. I was very proud of it, being this the first time ever I made the costumes myself. Usually we run to Party city the night before Halloween; stay in crazy lines; get a wrong sized costume because I can’t find the right size and give them a $5 off $20 coupon only to find out its not valid for use with costumes!
OK, now, back to pictures.


I have to get back to some serious sewing. Oh, not so fast, when I recover from this flu, I will get back to some serious sewing.
I've been blog hopping and found awesome pictures of Halloween costumes and trick or treatin'. Yes, we also did have a blast at the parades at AN's and BN's schools and our condo community. Unfortunately, I haven’t been feeling good myself. Sunday mid night I got up to a bad sore throat and terrible headaches and body ache. I must have the flu. The worst part is, I can’t eat and I can’t swallow, my sore throat is killing me. SN took the kids to trick or treating as I had already started feeling bad after the parade on Sunday.
That is why I couldn’t post the pictures, and I was thinking this morning, should I post the pictures or not. Remember, I made the costumes for AN & BN. I was very proud of it, being this the first time ever I made the costumes myself. Usually we run to Party city the night before Halloween; stay in crazy lines; get a wrong sized costume because I can’t find the right size and give them a $5 off $20 coupon only to find out its not valid for use with costumes!
OK, now, back to pictures.
AN's school parade
AN & BN at home getting ready to trick or treat


BN was very happy as you can see. It's her first time going out trick or treating.


I have to get back to some serious sewing. Oh, not so fast, when I recover from this flu, I will get back to some serious sewing.
Monday, October 25, 2010
A weekend in pictures
A weekend of pumpkins and apples at the picking farm. Now I need to figure out recipes to use 12 Lbs of apples we picked.


That was all the fun we had over the weekend. Rest of it was chores + finishing Halloween costumes (yes, I did it!!), so on and so forth.
Thursday, October 21, 2010
Yes, Bats.
So after reading the BATS post over at MADE, I couldn't wait to do this project with AN. Like I said many times before AN loves Halloween dearly. He loves everything about Halloween. He only complains that we don't do enough Halloween stuff at home. So I thought it would be a perfect project. I ran over to Joann at lunch break yesterday and got some black construction paper. Got pretty big sheets, 2 of them for $.49 each. Good enough.
After work, I was taking AN to his Kumon lessons and told him while we were in the car that I had this bats project stuff ready. He was so thrilled, he even asked me if we could go to Kumon after finishing that project. Anyhow, we came back home and started working on the bats. It turned out pretty good. We only used 1 sheet of paper, the rest is due tonight. We stuck some in the living room and some in the outside wall. AN loved it. If only the construction paper was a little thinner, AN couldn't cut it all himself, I helped him along the way. So presenting....Bats!


While AN & I were busy with bats, BN managed to get into AN's Kumon T-shirt he threw in the air after coming home from Kumon (is it just my kids throwing stuff around after school, karate, so on and so forth?). Oh, and she didn't stop there, she managed to get inside the bathroom, get up on the toilet (yes, the toilet cover was down), then get on top of the sink. How intelligent is she? Then she opened the tap, and started playing with water. Hearing the water running, I checked what was going on and I couldn't stop laughing. I had to get the camera and capture this moment.


After work, I was taking AN to his Kumon lessons and told him while we were in the car that I had this bats project stuff ready. He was so thrilled, he even asked me if we could go to Kumon after finishing that project. Anyhow, we came back home and started working on the bats. It turned out pretty good. We only used 1 sheet of paper, the rest is due tonight. We stuck some in the living room and some in the outside wall. AN loved it. If only the construction paper was a little thinner, AN couldn't cut it all himself, I helped him along the way. So presenting....Bats!
Costume wise, not much progress. AN's cape is almost finished. Need to attach the Velcro, just learned from my friend that her daughter H who is AN's best friend, is Super Girl this Halloween. Now that's awesome.
Tuesday, October 19, 2010
The wonderful blogger whose work helps me a lot
You must know her already. She is very famous and active in the blog land. If you are a beginner sewer, or you are experienced but never tried drafting, its a good idea to hop on over to IKATBAG. She has really great tutorials on everything from bags (Oh, I love her bags) to clothes. But what I very often check her site is for the drafting series she and her friend Jen have put together. It's detailed, long, but its worth spending some time reading through all that material. I adjusted a sleeveless jumper pattern to sew BN's super girl top. Thanks to her tips, it turned out wonderfully.
Now, I've been looking for a tutorial for a tunic/Polo shirt placket for a very long time, that is 1.5 hours, no just kidding, actually for weeks. I searched on Google, but could not find anything clear with plenty of pictures. So after fiddling with 4-5 different ways to create a placket I was successful in creating one, and more importantly repeating that success. So I am ready to write up a tutorial. But not very soon, as you may know I lost 2 weeks of my time to an injury. I have to finish AN's costume, BN's jumpers, and the tunic style Indian Kurta that I am making for AN.
Thanks for stopping by.
Now, I've been looking for a tutorial for a tunic/Polo shirt placket for a very long time, that is 1.5 hours, no just kidding, actually for weeks. I searched on Google, but could not find anything clear with plenty of pictures. So after fiddling with 4-5 different ways to create a placket I was successful in creating one, and more importantly repeating that success. So I am ready to write up a tutorial. But not very soon, as you may know I lost 2 weeks of my time to an injury. I have to finish AN's costume, BN's jumpers, and the tunic style Indian Kurta that I am making for AN.
Thanks for stopping by.
Monday, October 18, 2010
Monday Blues and Super Girl
Every Monday comes with a truck load of new things for me. Unfortunately nothing very exciting. Its mostly work stuff. Only thing that keeps me going is that in 5 days, I am going to get another weekend. Now, thats something to look forward to.
Over the last month I have completed BN's Halloween costume. Yes! Super Girl, DONE! I chose to do BN's costume first because she is a petite girl who takes less than 1 yard for any of her clothing. In case I need to scrap it and re-do, I don't have to cry over the yards of fabric I wasted. AN is not so happy about that. He thinks I love BN more and that is why I make her things first. As a matter of fact I did make his unitard first, but it just didn't come out right, wearable, but it has too much ease. Not good for a unitard, right? For the logo, I used my "home made" super man appliqué pdf found here. I printed the logo in 70% scaling on A4 paper. Cut out the red felt, yellow felt, appliquéd it to the cape and top. Pictures coming very soon.
For most of this stuff I drafted the pattern myself. Now, I am no expert in drafting, but received all help from a wonderful blogger. I will make another post about her work. I am sure you must have already found her.
Happy Monday everybody. Thanks for stopping by.
Over the last month I have completed BN's Halloween costume. Yes! Super Girl, DONE! I chose to do BN's costume first because she is a petite girl who takes less than 1 yard for any of her clothing. In case I need to scrap it and re-do, I don't have to cry over the yards of fabric I wasted. AN is not so happy about that. He thinks I love BN more and that is why I make her things first. As a matter of fact I did make his unitard first, but it just didn't come out right, wearable, but it has too much ease. Not good for a unitard, right? For the logo, I used my "home made" super man appliqué pdf found here. I printed the logo in 70% scaling on A4 paper. Cut out the red felt, yellow felt, appliquéd it to the cape and top. Pictures coming very soon.
For most of this stuff I drafted the pattern myself. Now, I am no expert in drafting, but received all help from a wonderful blogger. I will make another post about her work. I am sure you must have already found her.
Happy Monday everybody. Thanks for stopping by.
Subscribe to:
Posts (Atom)