
Oh, the plackets!
OK, so I needed to learn how to do plackets. I am looking to make a summer tunic for my son. I know, it's 40 degrees outside, which will only go down to -1 degree in the next three months. So why I am doing it? It's kind of a traditional men's wear in India and I wanted my son to have one. That's it. I am sure that's a good enough reason.
Here is a picture from amazon.com

You can see this product here in the below ilnk
See that placket in the front, in the above picture. I started hunting for tutorials. I did find a few, but nothing that showed plackets clearly with a contrast fabric for the placket vs the bodice. That is a concern because otherwise, you won't be able to clearly see what's being worked on. So I decided to come up with a basic placket construction-howto, with contrast fabric for the placket.
Note: The Fabric you see in the construction is not my son's tunic fabric :-) Just scraps I used to do the tutorial.
Plackets - How to

Minimum Requirements
- The main fabric bodice piece
- Placket Fabric - 8 in length X 6 in wide (Placket fabric may be the same fabric as the bodice, you may choose contrast)
- Sewing machine, needles, fabric, and any other fancy sewing tools you can't live without
Let's get started.
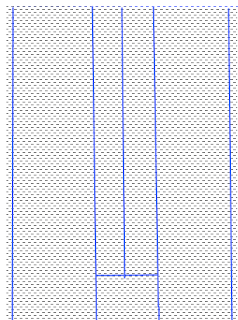
Step 1: Mark your placket pattern

- You will need to mark a line at the center of the placket (along the 8 inch side, remember that is the length of your placket) and 2 lines to the left and right of the center line 1/2 inch from the center
- You will also need to mark 1/4 inch seam allowance on the 8 inch sides
- Now mark a line 1 inch from the bottom of the placket connecting the lines you made to the right and left of the center
This is what you will end up with
Step 2: Align placket and bodice center, right side together
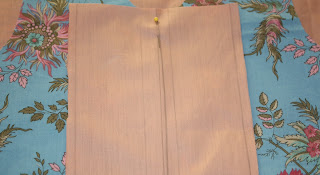
Align the center of the placket to the center of the shirt/dress and pin.
Step 3: Sew along the 3 lines
Sew along the markings to the right of the center line through both layers (main fabric and placket). Sew through the horizontal line and go to the other side of the center line.

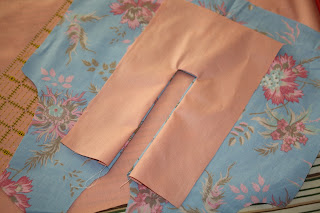
Step 4: Cut a Y along the center line
Now, cut along the center line starting from the neck end. Stop 1 inch away from the bottom of the placket end. Then cut towards both corners of the Y. Before you cut look at the picture below.

Step 5: Turn placket inside
Because we sewed right sides together you must know that there is some turning somewhere in the process. And you do that now, carefully. Now, press.
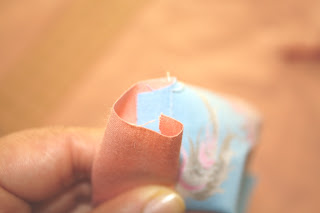
Step 6: Make a fabric Sandwich and sew
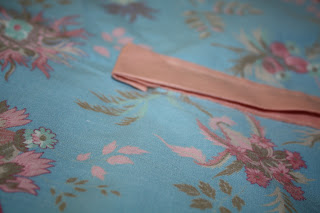
Now, you have the wrong side of the main fabric facing you and the right side of the placket. First we'll work on the left piece. Fold the seam allowance and then fold the whole left piece right in the middle. See a close up below.
Press and sew along the seam of main fabric and placket fabric on the right side of the fabric because that stitch shows well, so you need to make sure that looks good. Now repeat the same for the right side. Now you will have two pieces overlapping one another. You can choose one or the other to go on the front. People say men's plackets are opened to the right and women's to the left. You choose your style now.
Step 7: Finishing Touches
Now on the Wrong side of your main fabric tuck in the 1 inch we left out earlier and pin in place
On the right side of the fabric, start with the placket that's overlapping the other, and sew along the folded edge and sew over the pins that you just placed. Now you will have 3 sides of a rectangle nicely sewn. Please pay attention and don't sew over both layers of the placket when you sew the folded edge.

There you have it. A placket. I hope it helps
nice little tutorial, i remember when i first made my placket salwar kameez, i had to search for half a day, then gave up and examined and opened up my hubby's polo t-shirt and figured it out... :)
ReplyDeletei still have that scrap piece fabric (just a basic rectangle with contrast placket in it) to refer to whenever i make a style having placket front...