Yes, it is now time to say good bye to 2010. It was a good year I'd say. The 2010 resolution to being more active and eat healthy did not work out. But a number of good things happened; AN started learning Violin and Carnatic Music, I started sewing and blogging. All was good, including the energy and happiness that music has brought to our lives.
Now, its time to set our resolutions for the new year straight, trying to stick to a few, trying to slide a few through....Should be fun!
Happy New Year!

Friday, December 31, 2010
Thursday, December 30, 2010
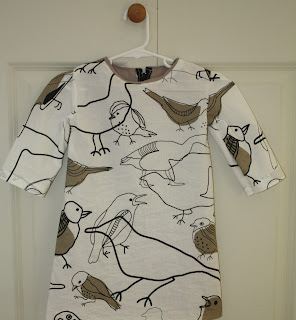
The Bird Call Dress
2010 will be history very soon. The kids are home for Winter break. Having a 7 year old and 2 year old runinng around, fighting for toys, nagging for TV time is a handful itself, along with that I am working fulltime from home.
Oh, and I almost forgot the blizzard that I mentioned in this post, by the time left, had gifted us 30 inches of snow. And that makes our car look like this.

In the midst of all this I couldn't resist cutting into this cute IKEA fabric.

I made this dress using a basic jumper pattern and adding sleeves to it. I lined it with matching chiffon.
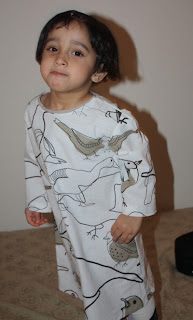
and here's BN wearing the dress, I told her, it's the birdie dress. She absolutely loves to name clothes, the horsie shirt, the cute cats dress, now the birdie dress.
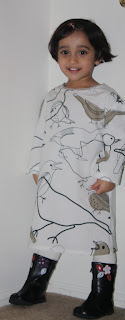
and here's BN jumping up and down the bed!
I got more fabric from Joann last night for Pajamas for BN. But not sure if I will be able to finish any of that this year. But I so want to come back for a final 2010 post. Till then.
Sunday, December 26, 2010
The snowflake and the bubble
Over the years Rockefeller Christmas tree and Saks 5th Ave video projection have been transformed into a kind of Holiday tradition around here. We do try to make it every year, so this year on Christmas eve day we trekked up there to see the lights. This year's 3D projection by SAKS 5TH AVE is one show you'd sure remember for the years to come, we'd, but then again because we see it almost every year and we tend to compare it with past years and judge and the verdict is not as good as 2008 show. Why can't we just enjoy? Here is a video of the whole ~ 3 min show.
It goes every 10 or 15 minutes. No tickets, no charges, just lean on to one of the shop-walls across the street and enjoy. Very unlikely of NYC, you'd think, are we talking about the same city that charges $50 for it's museums and such. But then again, you have to applaud the Mayor and the city for keeping its parks clean for it's children, a public transportation system that runs almost smooth (hey no system is perfect), a public health insurance program that the self employed and uninsured can rely on so on and so forth.
OK, I know I am starting to get detoured a bit. The thing is when I talk about NYC, I remember the days I used to work in midtown Manhattan. Sure the commute was hell. But once you get there, its magic. That is until 4pm, after that you (by you I mean I) get a little restless thinking about getting home, picking up AN from the day care, if it's winter, getting the car dug out of the snow mountain before I can pick up AN so on and so forth. Until that 4pm you can take a break, walk the streets of the greatest city in the world, take a peek into the magical store windows displayed so meticulously, enjoy 100's of world's cuisines available with in the first 50 streets, oh well, I don't work in NYC anymore. The only trip to NYC I get is this yearly trekking to see the lights.
And guess what, the yearly Christmas blizzard is here. We haven't done our groceries for next week yet. Let me take a quick picture of what I see out of my window.

There you have it. It's falling at 1 inch an hour rate.
BN is hungry and did not have lunch yet. Time to get back to my motherly duties.
Thursday, December 23, 2010
What have we been up to?
Baking yum yum cup cakes, doing the mind boggling job of figuring out what would be the best gift for everybody on the list, wrapping gifts, BN unwrapping the gifts I wrapped, then a cranky me wrapping it again. Yeah, that's what we have been doing around here lately.
The whole week next week AN has winter break. I am going to have to work from home for the whole week. 2 demanding kids, a demanding job and my laptop and me in the middle. It's gotta be fun!
AN has another math test today. It's a day before Christmas eve and the last day of school before Winter break. I would say not a good time for a test. I hope he nails this one as he did the last one (checkplusplus, that school talk for 100%).
Saturday, December 18, 2010
Pictures that speak a thousand words!
Saturday Morning this happened.....
Saturday after noon this....


After the above two this...Remember this?
Friday, December 17, 2010
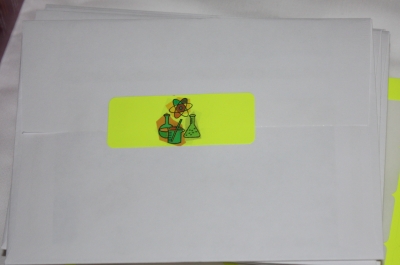
Custom Address Labels and stickers - MAD SCIENCE party - Tutorial
See when you get creativity rush, nobody and nothing can stop you, except time, lack there of to be precise. When I finished THE CARD I wanted to do stickers. When I was done with stickers I wanted to do address labels. I had to stop there because we needed to give families at least 15 days to RSVP.
Alright, enough chit chat.
Gather your supplies
You will need:
- Creativity and a good mood
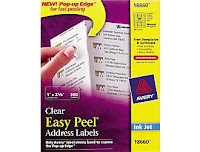
- 30 per sheet address label sheets, color of your choice
- Address Label Template to use with Microsoft Word software(Click here to get this from Avery website. if you know how to get the templates in Microsoft Word, you don't need to go to Avery website)
- PAINT.NET software or any other picture editing software
- A color Printer
Got what you need? Let's go!
Step 1: Get the image ready
To do this you will need to open the photo editing software. Create a new project with 203 pixels width and 62 pixels high (This will translate to: 2.11 inches width and .65 inches height). Now get the picture of your choice from your computer, clip art. I used a clip art image. WARNING: You may need to re-size the images as necessary. It should fit into 2.11 inches by .65 inches.
These are the images I came up with.
Address label

Sticker

Step 2: Set up the template
Open the template by clicking the link in item 3 above. What you will see is this.

Next up, you have to select each of the 30 little rectangles one by one and change the border format of the boxes to something you like.

Now you need to right click on each box and click "Add Text"
Now, you need to copy the images you created from your photo editing software and paste it to each of the boxes. Paste it as per your needs. For example you may want 15 labels and 15 stickers.
(After you are done doing step 2 you may save the file for future use)
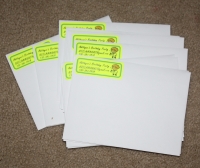
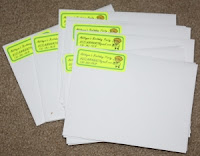
Step 3: Print
Now, Print your work to the label sheets. Peel off and stick to envelopes. Viola!


Enjoy! Have a great weekend.
Monday, December 13, 2010
Custom made MAD SCIENCE PARTY Invitations - Tutorial
Good Morning!
This morning AN started inviting his friends for his birthday party. Here is the super cool hand made (with the help of a home printer and CVS Pharmacy) invitations.
This morning AN started inviting his friends for his birthday party. Here is the super cool hand made (with the help of a home printer and CVS Pharmacy) invitations.

Not bad for 11 cents each! Would you like to hear the story behind this?
SN & I decided to throw a Mad Science party and that brought us to the whole dilemma of whether to create invitations or buy them? If buying where do I buy those from, Internet sites (like etsy) or just buy from Mad science itself? We needed around 25 invitations. In the spirit of my making things myself this year, I decided to give it a try. I have to say it turned out pretty good.
If you start making, you will never ever buy birthday invitations. And Mad science invitations are so hard to find, the ones you find are super expensive. If you have around 1-2 hours (with an additional 1 hour for pharmacy printing), you can do it! And that "Mom, you are awesome! You can make invitations!" from your son is worth all the effort :-)
And better yet, you can involve your children, They will love clip arts. Trust me. I've seen my son jumping up and down when he could drag a rocket picture into a word doc.
Ready?
Grab your supplies. You will need:
- A Windows computer with Microsoft Word 2003 or later (tech jargon for release after 2003) (Note: I am not marketing)
- Paint.NET photo editing tool. You can get it for free here. If you have another photo editing tool that you are comfortable with, go on with that, if it can clip a picture it will work!. http://www.getpaint.net/
- Box of envelopes that can hold 4 X 6 Pictures ( I bought (1) 50 count box from Staples for $5.00)
- Pencil and a sheet of blank paper to sketch your design
- Birthday kid and siblings if available
Got everything? Let's start.
Step 1: Decide the card size you want and open PAINT.NET and set up a new picture project
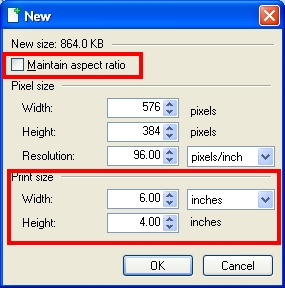
Open PAINT.NET and Click on New icon to create a new picture. Choose the print size you want. I chose to do a 4 x 6 print.
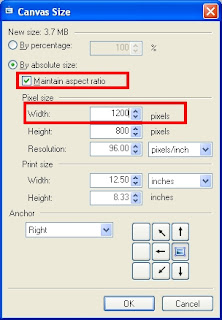
Now, the most important part. Click on Image (menu on top) -> Canvas size. Change the width to 1200 pixels keeping the aspect ratio ON. This is to ensure your picture won't be distorted when you print the invitation.
Step 2: Sketch your design
On the blank sheet of paper, layout a draft of how you want your invitation to look like. Skip this part if you are comfortable with your photo editing tool, you can design as you go!.
Step 3: Decide on the pictures you want on your card
You want to make invitations? Clip Art is your friend! The pictures are free to use, no copyright issues, as long as you download it from your word document tool. Let's go find the pictures we need!
Open a new word document and click on the menu Insert->Pictures->Clip Art. Type in lab and click the Go button to get the pictures with the tag: "lab". Drag a picture to the document. Use other keywords like "scientist", "beaker", "test tube" etc to find the related pictures.
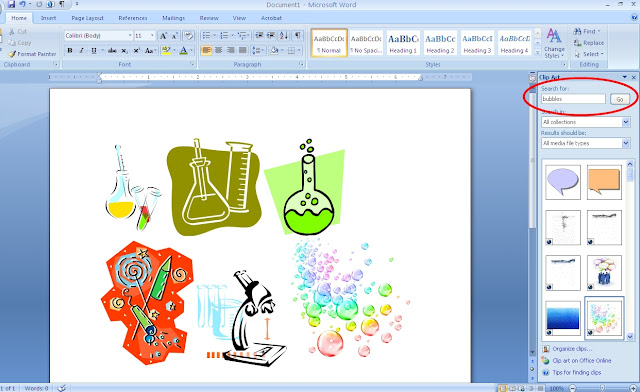
I decided to use the above pictures in my card. Go crazy and find the pictures you love most. Choose images that are not too small in size. You want a high resolution image so when printed it won't look grainy. In layman's terms, if you can enlarge a picture without distorting it then it is a high resolution image.
Step 4: Resize your clip art and transfer to PAINT.NET

I resize the pictures right in Word to fit the design I had in my mind. Make sure you use the diagonal re-size arrow to keep the picture intact without distortion. Now right click and copy and paste to PAINT.NET
Step 5: Type in matter using the Text tool in PAINT.NET, Add Borders etc
Try different fonts, rearrange the pictures, play around, do it until you get something you love! I just love the free style font. It's a mad science party and scientists love scribbling! Perfect.
Step 6: Upload and pick up
Upload to your favorite photo printing place. Remember
to use coupons. Also use the print size as the one that you selected in inches in step 1 (4 x 6 in my case). It cost me $0.71 after coupons.
Step 7: Get the envelopes
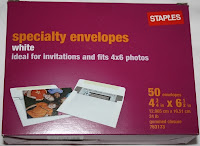
I used these from Staples (it was on sale for $5.00)
Step 8: You are done! Look at the envelopes, and cards and be proud of yourself. It cost me around 11 cents each! Awsome, huh?
In the next post, I will tell you how to create these custom stickers and address labels!
Thursday, December 9, 2010
Back to square one and busy with a brand new project!
I wanted to quickly stop by and post what I am up to now. So it turns out the fabric in the mail I received yesterday wasn't quite the one I ordered. I was expecting a shiny feel to it. I returned the whole package; Now I am back to looking for the perfect fabric. That's boring.
But I have a perfect project in hand now. I am planning a birthday party for AN. He turns 7 in January! Exciting! We are throwing a MAD SCIENCE party for him. We booked the Mad Science guys. I just picked up the invitations I made (yes, I did!) from CVS.
More party tips and printables along the way.
Tuesday, December 7, 2010
Weekend Project in picture(s)
How was everybody's weekend? I know it's too late to ask that considering the fact that half of the word is already enjoying Wednesday. My weekend was really bad, yeah. There you have it. I don't want to go into the details, because it IS after all my happy place here. I did finish the remote holder/hanging caddy over the weekend. What I could not finish was the tutorial. I do have a super ugly picture of the caddy though, here! ha ha ha.

I have to go out and get stiffer interfacing and more batting for the tutorial. Sorry, I realized I had no more interfacing after cutting the fabric. See?


Will be back sooner than you think.
Friday, December 3, 2010
Forgotten Tunic project
Finally! It's Friday.
This weekend I have every intent to finish the little accessory project I started last night. If it turns out lovely, I will make a couple and post a tutorial. I also want to start the long forgotten Indian Style Tunic Shirt project for AN. Remember? This style?
 I completed a trial run, now is the time to start on the real stuff. I am looking at these two choices at fabric.com.
This weekend I have every intent to finish the little accessory project I started last night. If it turns out lovely, I will make a couple and post a tutorial. I also want to start the long forgotten Indian Style Tunic Shirt project for AN. Remember? This style?


Wednesday, December 1, 2010
I won the Tamron lens!
I just got an email from Dana from http://www.dana-made-it.com. Guess what? I won the Tamron lens! It is this lens, right here in the link below.
http://dana-made-it-reviews.blogspot.com/2010/11/tamron-af-18-270-zoom-lens-giveaway.html
Thanks to Dana, BlogHer network and Tamron. Wow! Pinch. I will certainly be coming back and sharing my experience with it. I can't wait to get my hands on it.
Too excited.
http://dana-made-it-reviews.blogspot.com/2010/11/tamron-af-18-270-zoom-lens-giveaway.html
Thanks to Dana, BlogHer network and Tamron. Wow! Pinch. I will certainly be coming back and sharing my experience with it. I can't wait to get my hands on it.
Too excited.
Beginning of the end of 2010
Isn't it? December always comes with a perplexing look, making you wonder what you've accomplished in the last year. For so many, it's a time to finish up things. For some, it's time to use that treadmill they bought on January 10 so they can tell their spouses, hey I used it! For some it's time to think up some new resolutions for January 1st. I've been there in all these situations before, this year? I really am not sure what I want to do before the year comes to a close. OK, I will come back about that on another day, oh, definitely before January 1st, 2011.
We've upgraded our camcorder to a Sony HDR CX-150 in black (I so wanted red, too bad SN dislikes accessories and the like in red) from Canon Optura 40.

I wasn't so crazy about it after the first look. Although it does shoot reasonably good HD quality video, transferring is a pain. You need the software that comes with it to watch it (Hey Sony, you can do better than that! Please...). It is so tiny, and not too fragile to handle. There is an in-built lens cap, which comes in handy.
We did try a Canon FS300, which could transfer videos like pictures (you know, you stick the memory card into computer slot and it transfers pictures without any extra software?) and play right away on your Windows Media Player. But the quality and image stabilization (a fancy term for keeping the video stable without blurring when objects move) sucked.
So we went after this one, SN's pick. I think I like it, except for the transferring part, because I am going to be the one doing the transferring :-(. I still have to figure out a lot of things with this one, our first Sony.
In sewing news, I have a little project on the way. Because of the two jumping monkeys in my household, it is very hard to find our TV remotes when we need it. Are you thinking remote caddy? I thought about that too, the trouble is, AN & BN are so good in climbing and reaching it no matter where you keep it. So the solution is a hanging caddy. I have the fabric and batting cut and ready, all I need is some time in front of the machine. If its successful, I will post a how to tutorial, or should I make a video tute, now that I have the HD camcorder?
Have a happy and cheerful Wednesday everybody!
We've upgraded our camcorder to a Sony HDR CX-150 in black (I so wanted red, too bad SN dislikes accessories and the like in red) from Canon Optura 40.
I wasn't so crazy about it after the first look. Although it does shoot reasonably good HD quality video, transferring is a pain. You need the software that comes with it to watch it (Hey Sony, you can do better than that! Please...). It is so tiny, and not too fragile to handle. There is an in-built lens cap, which comes in handy.
We did try a Canon FS300, which could transfer videos like pictures (you know, you stick the memory card into computer slot and it transfers pictures without any extra software?) and play right away on your Windows Media Player. But the quality and image stabilization (a fancy term for keeping the video stable without blurring when objects move) sucked.
So we went after this one, SN's pick. I think I like it, except for the transferring part, because I am going to be the one doing the transferring :-(. I still have to figure out a lot of things with this one, our first Sony.
In sewing news, I have a little project on the way. Because of the two jumping monkeys in my household, it is very hard to find our TV remotes when we need it. Are you thinking remote caddy? I thought about that too, the trouble is, AN & BN are so good in climbing and reaching it no matter where you keep it. So the solution is a hanging caddy. I have the fabric and batting cut and ready, all I need is some time in front of the machine. If its successful, I will post a how to tutorial, or should I make a video tute, now that I have the HD camcorder?
Have a happy and cheerful Wednesday everybody!
Sunday, November 28, 2010
Bold Batik Prints and Simplicity 2320
Before I immerse myself in my Google Reader, I quickly wanted to share some bold batik print fabric I got this weekend. I have absolutely no idea what I am making with these. But I have a good feeling I will eventually put these to good use.


In other news, I finished the first Simplicity 2320 dress. Here is an action shot. This was the trial run. I don't like to make trial muslin dresses, I may be naive, but when I put some time and effort into something I would like that well used.

I know it's not such a great picture. The print camouflages the details of the dress. That's OK, I only intended this dress to be a trial run. Next up, I will make this dress in solid silk so all those little details are nice and clear.
OK, off to Google Reader. This time I really mean it.
Thanksgiving 2010
So that's over too. The longest holiday weekend of the year. Thanksgiving weekend. We had good food, good friends, and more importantly good family time this weekend.
A good percentage of Americans get a 4 day weekend for Thanksgiving while the not so fortunate rest have to work so the above mentioned group can enjoy their weekend. One word. Corporate Greed. I felt bad for Kmart employees when I saw Kmart's TV Ads about them remaining open on Thanksgiving day. I understand why airports, trains, hospitals, buses, drugstores have to keep going, but a national chain super market? I don't know about that.
Over this weekend, I was amazed at the extent the big corporations will go to lure customers. I've seen stores advertising and selling special items designed for Door buster sales on black Friday, stores advertising high ticket items for rock bottom prices with only very few of them "IN STOCK" (yeah, I know they have lots in stock!), so on as so forth. I even saw banners like all bras $15.99 when you buy 3 or more at a Hanes Brand outlet store, Really? Isn't that your regular deal? Please!
That all being said, although I didn't "bust" the store doors or anything like that on Black Friday, I did visit a few stores and the nearby outlet mall to see the truth about deals, doorbusters and such after 6am. I did not find anything to die for, but Children's Place had a good 50% off entire store deal *all day* ( not the ridiculous 4am to 8am thing you see in some places) and I got some stuff from there. I also bought a Cuisinart food processor/blender combo (gift for a friend) from Bed Bath and Beyond. They, as usual did not have any outstanding deals to offer. Most people must already know you should never buy things without their 20% off coupon.
OK, enough of the BF stuff. Between entertaining guests, family, going to parties, I've got a lot of blog catching up to do.
See you soon. Thanks for stopping by.
Monday, November 22, 2010
Time saving Tech Tips
Good Morning to all.
Ah, Monday again.
I work in the IT field, some of you may know that from my "about me" page. So I want to share a few tips that every IT person knows, which saves time while working with computers. Most of the bloggers out there spend a good amount of time in front of the computers. Some of you may know this, but here is some very basic information anybody who uses the computer should know.
Copy Shortcut
To copy text to your clipboard, highlight the text and hit Control key and C key together. That is usually called "Control C" written as Ctrl+C. I've seen people going to their edit menu to find the Copy option or right clicking to find the copy option. This saves time.
Paste Shortcut
To paste text, Point your cursor to the text area you want it to be in, and hit Control key and V key together. That is usually called "Control V" written as Ctrl+V. I've seen people going to their edit menu to find the Paste option or right clicking to find the Paste option. This saves time too.
Find Shortcut
Lets suppose you are on a web page and you want to jump to an area in the page containing some specific text. To do that, you could go to Edit menu and look for the Find option. Instead you can use Control and F keys together. It's usually called "Control F" written as Ctrl + F. You get the same "Find Window" where you can type in your letters. You can use Ctrl+F on most programs (like Word, Excel, IE, Firebox etc). In some cases, instead of the standard "Find Window", there is a special thingie. You will know when you see it.
Google Cache Option
SO you are looking for that post about princess seams you thought you bookmarked, but you never did actually. You are back googling trying to find it and you see million hits in google. You decide to give it a try and open a few pages to check if it's the one you want. You want to quickly see whats in the page. You know what you can do? In the google search results page, right under the each result there is an option called "Cached". It gives you a screen shot of the actual page. This means, you can see the page without actually going to the website, but simply by going to the screenshot that google has for that page. The bonus? It highlights the keywords in yellow.
I think thats good for today. I will post more tips as I find time...
Have a good day!
Friday, November 19, 2010
How to: 7 minute Fringed Interlock/Fleece Scarf

Like said in the last post, this is a really easy project. It's a scarf! It is so simple that it takes less than 10 minutes for you to make this. It took me exactly 7 minutes! with a regular sewing machine.
If you choose to use two different fabrics then it's a two seam prject, otherwise just one seam and you are done. Because it's so less time consuming you can make it in awesome knit/fleece prints, make a bunch, use it as a fashionable accessory with skinny jeans and boots for youself or make one for your little girl/boy.
A little tip: Joann's Black Friday ad shows $2.99 fleece prints! If you use those, you get this scarf for $1.50!
A little tip: Joann's Black Friday ad shows $2.99 fleece prints! If you use those, you get this scarf for $1.50!
Want to make one?
7 Minute Easy Interlock knit/fleece scarf - How to:
Minimum Requirements
- 1/2 yard of 44'' Interlock Knit/Fleece fabric
- Sewing machine, thread, scissors, a scale and any other fancy tools you cannot sew without
Step 1: Prepare and cut Fabric

No cutting required if your fabric is a precut 1/2 yard. Otherwise cut out 1/2 yard of the fabric you have. If you want to choose two different prints, you know what to do, use 1/4 yard each of the prints.
Note regarding length: For adults you could safely use the full length of the yardage. If you are making for a kid 4 years and less: you may want to decrease the length to 35 or below according to the kid's height. The point is you do not want the scarf to be hanging longer than the jacket when wearing.
Step 2: Fold right sides together lengthwise

Notice that I have my fabric folded lengthwise, right sides together.
Step 3: Sew along the length with 5/8 inch seam allowance (using a triple stretch stich for knits)


Step 4: Turn Right Side out
Now what you get is a long tube. You may choose to top stich at this point. I did not.
Step 5: Fringes
The Scarf is almost ready. If you are making this for a man who does not like fringes you may tuck the raw edges in use a top stitch and be done!. If you want the fringed edges, mark 6 inches from the short edges (on both short edges)

Step 6: Cut Fringes
1 inch apart from each other cut (5) 1/2 inch fringes. Do this one the other short side

Step 7: Enjoy your new scarf!

Thursday, November 18, 2010
A little project with 2 seams coming your way
Apparently I forgot to write about something I made for AN on Sunday night. This morning while AN & I were waiting for the school bus, one of the other moms complimented on it and her little girl AC started whispering, 'mommy, I want one...I want one...I like it..'
It is the easiest project ever with only 2 seams and so I will post it as a project/tutorial/how-to or whatever you may call it.
By tomorrow morning, I should have it ready. Interlock Knit/Fleece fabric, two seams, a little project, hmm...what could it be? may be an accessory?
Thank you for stopping by. Have a good day!
Monday, November 15, 2010
Friday yet?
How is everybody today? I know for a fact that I feel sleepy, tired and anxious. I am not really sure if I like Mondays; Although sometimes I feel very excited to get back to work on a Monday. Typically that happens when I get all weekend chores like laudry, cooking, cleaning, grocery etc done by Sunday evening, pack lunches for Monday, get all home work and other school related stuff for AN ready, get to watch Desperate Housewives Sunday night, get a good night's sleep etc. Around 50% of these things did not happen this weekend, including the good night sleep part. Hence the crankiness. On a lighter note, it was my birthday on Sunday, no, not the regular calendar day birthday, the Lunar Calendar birthday. SN gifted me with a necklace set, totally unexpected. Thinking of that makes me smile now, I might just forget that I am cranky. No, I am not a material girl, but what girl doesn't like occassional display of love in the form of jewelry from her husband.
OK, but I have a really good project in the works.

Oh, also Walmart and Staples released their black friday ads. Couldn't find anything worth being pushed to the ground, having to drive around for 20 minutes trying to find a parking spot so on and so forth.
Have a happy Monday!
Friday, November 12, 2010
TGIF & Bubblegum Jumper Dress

I finished this dress. I used From an Igloo's Bubblegum Jumper Tutorial. I love the print. Perfect with a top and a pair of tights.
The whole week has been really hectic with work, It's not anything new.
Thank you for stopping by.
Have a great weekend!
Tuesday, November 9, 2010
Can't believe it's already November!
I still feel like the last Christmas was just yesterday. Right around Halloween a couple of weeks back I got an email in my Inbox from BF Ads Webmaster and I was like, huh? and I realized, yes, it's that time of the year! I couldn't believe that it was here already. We all at home felt like the last year just flew by.
So far BF Ads site has the Black Friday fliers of Macy's, Sears, CVS, Rite Aid, Walgreen's and Lowe's. So what are you looking forward to buy this year during the After Thanksgiving sale? Most people spend on electronics during that time, especially because it's supposed to be cheapest. But not really so. I've bought Hard Drives, DVD burners, cameras etc on Black Friday from Staples with coupons and Rebates and received the stuff practically free. But I know for sure, for some reason, the quality was sub par. For instance the DVD burner I bought from Staples broke in a few months and I went to HP website to get the drive update so I can make it work again. To my surprise the DVD burner I had was not a retail item and was an "OEM". It simply means, it came along with something else and hence has no separate drive update. So now I have to find a new one.
This year we are definitely getting a camcorder for the family. Since it is kind of a big ticket item that runs in the $400-600 range, we will be looking for Black Friday deals. My son AN would love a Wii. SN and I are still confused if we should get it for him or not. If we do, it is going to be yet another thing that we have to discipline him for. Still thinking about it.
Happy Tuesday everybody!
Friday, November 5, 2010
The dreaded Plackets: A picture how to
Oh, the plackets!
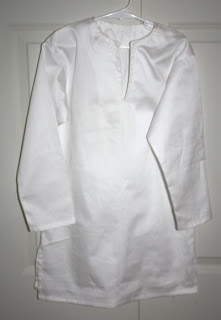
OK, so I needed to learn how to do plackets. I am looking to make a summer tunic for my son. I know, it's 40 degrees outside, which will only go down to -1 degree in the next three months. So why I am doing it? It's kind of a traditional men's wear in India and I wanted my son to have one. That's it. I am sure that's a good enough reason.
Here is a picture from amazon.com

You can see this product here in the below ilnk
See that placket in the front, in the above picture. I started hunting for tutorials. I did find a few, but nothing that showed plackets clearly with a contrast fabric for the placket vs the bodice. That is a concern because otherwise, you won't be able to clearly see what's being worked on. So I decided to come up with a basic placket construction-howto, with contrast fabric for the placket.
Note: The Fabric you see in the construction is not my son's tunic fabric :-) Just scraps I used to do the tutorial.
Plackets - How to

Minimum Requirements
- The main fabric bodice piece
- Placket Fabric - 8 in length X 6 in wide (Placket fabric may be the same fabric as the bodice, you may choose contrast)
- Sewing machine, needles, fabric, and any other fancy sewing tools you can't live without
Let's get started.
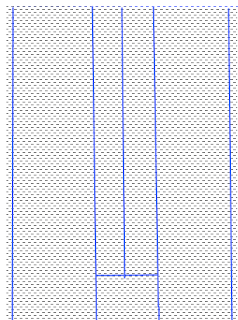
Step 1: Mark your placket pattern

- You will need to mark a line at the center of the placket (along the 8 inch side, remember that is the length of your placket) and 2 lines to the left and right of the center line 1/2 inch from the center
- You will also need to mark 1/4 inch seam allowance on the 8 inch sides
- Now mark a line 1 inch from the bottom of the placket connecting the lines you made to the right and left of the center
This is what you will end up with
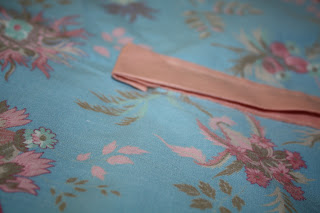
Step 2: Align placket and bodice center, right side together
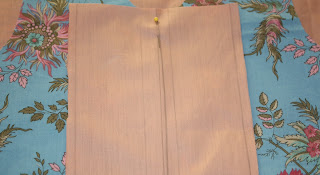
Align the center of the placket to the center of the shirt/dress and pin.
Step 3: Sew along the 3 lines
Sew along the markings to the right of the center line through both layers (main fabric and placket). Sew through the horizontal line and go to the other side of the center line.

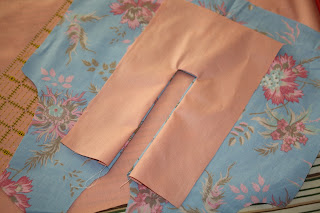
Step 4: Cut a Y along the center line
Now, cut along the center line starting from the neck end. Stop 1 inch away from the bottom of the placket end. Then cut towards both corners of the Y. Before you cut look at the picture below.

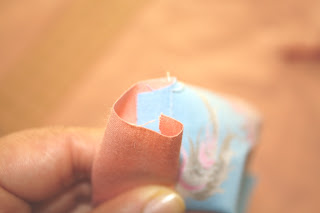
Step 5: Turn placket inside
Because we sewed right sides together you must know that there is some turning somewhere in the process. And you do that now, carefully. Now, press.
Step 6: Make a fabric Sandwich and sew
Now, you have the wrong side of the main fabric facing you and the right side of the placket. First we'll work on the left piece. Fold the seam allowance and then fold the whole left piece right in the middle. See a close up below.
Press and sew along the seam of main fabric and placket fabric on the right side of the fabric because that stitch shows well, so you need to make sure that looks good. Now repeat the same for the right side. Now you will have two pieces overlapping one another. You can choose one or the other to go on the front. People say men's plackets are opened to the right and women's to the left. You choose your style now.
Step 7: Finishing Touches
Now on the Wrong side of your main fabric tuck in the 1 inch we left out earlier and pin in place
On the right side of the fabric, start with the placket that's overlapping the other, and sew along the folded edge and sew over the pins that you just placed. Now you will have 3 sides of a rectangle nicely sewn. Please pay attention and don't sew over both layers of the placket when you sew the folded edge.

There you have it. A placket. I hope it helps
Subscribe to:
Posts (Atom)